In the below tutorial, I take you through the details of how we can translate the Dodge and Burn technique that we know well in Photoshop, into one that can be applied at the raw level in Capture One Pro. While capabilities for Dodging and Burning have existed in Capture One since version 11, the process that was once a bit cumbersome and limited is now refined and intuitive with the release of Capture One 20.
The video will show you how to create your layer stack, helper layer and brush settings as well as the mechanics of performing the dodging and burning itself.
The Layer Stack
For our layer stack we will need to create between 3 and 7 layers. A corrective dodge, a correct burn and a helper layer are our minimum setup. For a more full featured stack, we will also include a pair of strong corrective dodge and burn layers and a pair of contouring dodge and burn layers. The usage of these layers is outlined in the video but I’m providing a summary of the settings for each one here as a reference.
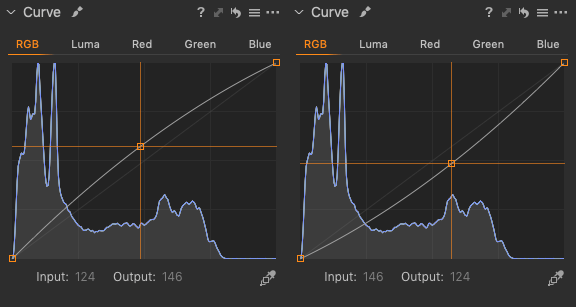
For the corrective dodge and burn pair. Add a new layer named corrective dodge and proceed to the curves adjustment as shown here. On the RGB curve, you’ll set your Input value to 124 and your Output value to 146. Much like its dodging counterpart, we’ll create a corrective burn layer and make an opposing curves adjustment within the RGB curve by setting Input to 146 and Output to 124.
The strong layers are meant to be a more powerful version of the above pair to be used for aggressive changes to details like eyes or lips and are created as follows. For these we will make adjustments to both the RGB curve and the Luma curve to make the effect far more pronounced. For the corrective dodge (strong) layer, In the RGB curve, the Input and Output values should be set to 137 and 153 respectively, while the Luma curve Input and Output values are set to 141 and 174. For our strong burn layer, we’ll make dramatic adjustments in the other direction. For the RGB curve, Input is set to 137 and output to 121 and in the Luma curve, set Input to 142 and Output to 110. You will notice a much more rapid buildup when painting on these layers so ensure that you build up your brush strokes gradually to avoid excessive retouching.
The dodge and burn contouring layers will be used to add depth and dimension to the image and are set up in the same manner as the corrective dodge and burn layers we’ve shown above. The only slight difference we will make is to set the opacity of these layers to 50% as opposed to 100% that we used prior. This will give us more latitude to adjust the intensity of the contouring up and down as needed at the end.
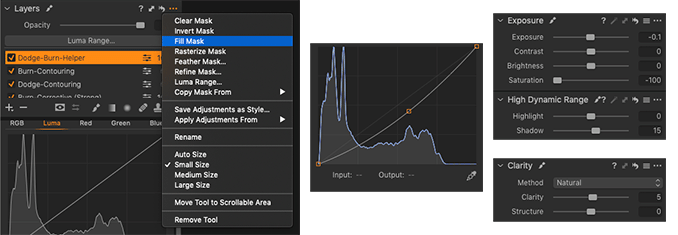
The final layer we need is our helper layer which will aid us in better visualizing the luminosity inconsistencies within the skin so we must both remove the color and darken our image. This is achieved via the adjustments shown below. To get started, create the new helper layer and fill the mask as shown below. Unlike the above layers, the mask must be filled in order for us to see our changes. Begin by setting Saturation to -100, Exposure to -0.1, and the RGB curve Input and Output to 146 and 115 respectively. As a final refinement, in the High Dynamic Range section, increase the Shadow value to 15 and the Clarity value to 5.
As you can see, creating these layers each time is rather time consuming and prone to error. If you find it it cumbersome to create the various layers needed, you may be interested in checking out my Dodge and Burn Layer Stack Helper Script to automate this process and make it quick and painless.
Since the recording of the above video, Capture One 20 (13.1) has been released which brought with it the enhancements to the brush tool and healing brush. These changes can be found in the quick video below.
Thanks for watching and don’t forget to subscribe to my YouTube channel for more updates!
The post Dodging and Burning with Capture One Pro 20 appeared first on Vibrant Shot Photography.


