Quantcast
Channel: Vibrant Shot Photography
Viewing all 44 articles
Browse latest View live

Why I Don’t Share Unedited Images

$
0
0

Toronto, Metro Hall, Before and AfterI get the question surprisingly often “can you post the original image”, and my answer is always the same, “no”. Rather than breaking into a lengthy explanation each time, I’m writing this article so that I can redirect future requests here. The reasons I don’t share my originals are many fold but also simple.

I consider photography to be the entire process of bringing an image from my eye onto the screen or print. This includes the capture and the retouching/post processing. In the days of film post processing was done painstakingly in the darkroom and to an extent, through the selection of film type. Today things have gotten a bit easier and we have tools like Camera Raw and Photoshop to help us achieve these effects and many more. While I try to always retain the original essence of what made the subject appealing to me, my aim in Photoshop is to bring out the qualities that were always there but I was incapable of capturing in the camera alone. The camera provides you with a handful of settings: aperture, shutter speed, ISO, white balance and focal length, and while I aim to get these right in camera, achieving the look that I deliver in my final images is simply not possible with them alone. My original vision of the photo includes the post processing that I will do to it, and therefore giving anyone an unprocessed shot is nothing more than providing them with an incomplete piece of work. Furthermore, the final image is often a blend of multiple exposures, be they varied shutter speeds, apertures, etc., and so an out of camera shot is only one piece of the puzzle and is in no way representative of the final image.

A similar story can be told of fashion, beauty and portrait shots. How often does one see a fashion shot with no processing at all, with all its original colors and flaws in tact? Not too often. Beauty shots take this to an even further level by emphasizing perfection above all else. Is this a good thing, or the right thing? I’m not necessarily saying it is but it’s simply the nature of that type of shot and I’m not one to debate or change that. Once again, showing an unedited shot would effectively fail to deliver its intended goal. With portraiture my editing is restricted to cleaning up blemishes and bringing back some of the depth and beauty that was lost when the sensor captured the image. In a portrait I want to make the subject look like themselves but also look their best, and this still involves some basic processing. Once again, showing you an unedited image is me doing a disservice to the subject because I’m not showing you the way they really look. After all, nobody looks perfect at 36 mega-pixels with a 500ws strobe blasting them in the face.

The main reason why I don’t show unedited images however is because it makes no sense. The people that like my images like them because of the way they look at the end, post processing and all. The same can be said of so many photographers that we all love. Most everyone processes the heck out of their images these days and standing out in this crowded field involves perfecting both your in camera and in computer techniques.

The post Why I Don’t Share Unedited Images appeared first on Vibrant Shot Photography.


10 Best Photos of 2012

$
0
0

Although a bit overdue, I thought I’d share my 10 favourite images that I shot in 2012 and explain what I like about them. At the least I can use it as a yardstick for 2013 and aim to improve. The images are in no particular order as ranking them from 1 through 10 would be too daunting a task as my preference for one over another seems to change on a daily basis. Part of my basis for selection was also their popularity on my Facebook page and on 500px where they cumulatively amassed nearly 3500 likes.

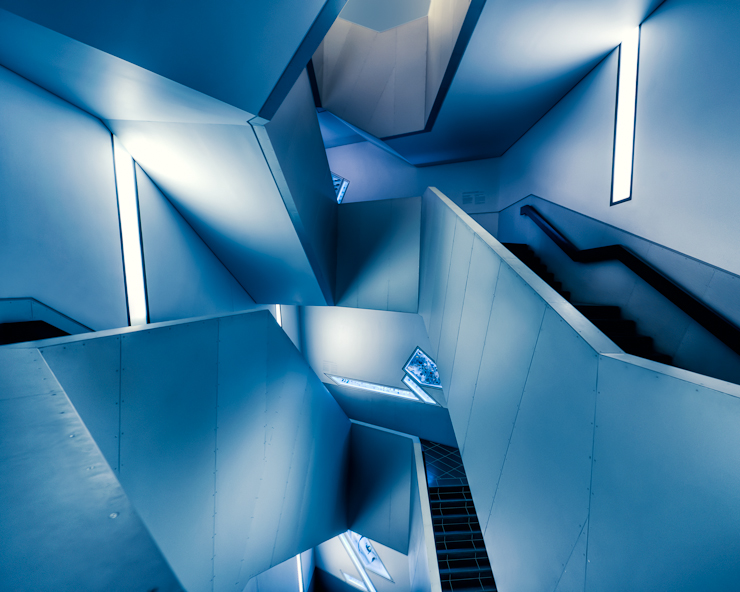
1. High Voltage

I shot this one at the Royal Ontario Museum in Toronto after getting my new 14-24mm lens and taking it out for a test drive. I didn’t expect much from the photo as the walls were dirty and the light created some really ugly color casts. Also, the design of the staircase, while incredibly cool and interesting, presented a lot of compositional challenges. I spent over an hour in the staircase and shot over 100 frames and just 2 were used as final images, this being one of them. What I like about the image is the Escher esque feel it gives you with lines running in all different directions and creating something that starts off feeling abstract and later becomes more clear. I chose to go with a blue color cast because the cool tones seemed to suit the futuristic feel of the structure best.

Royal Ontario Museum - Toronto

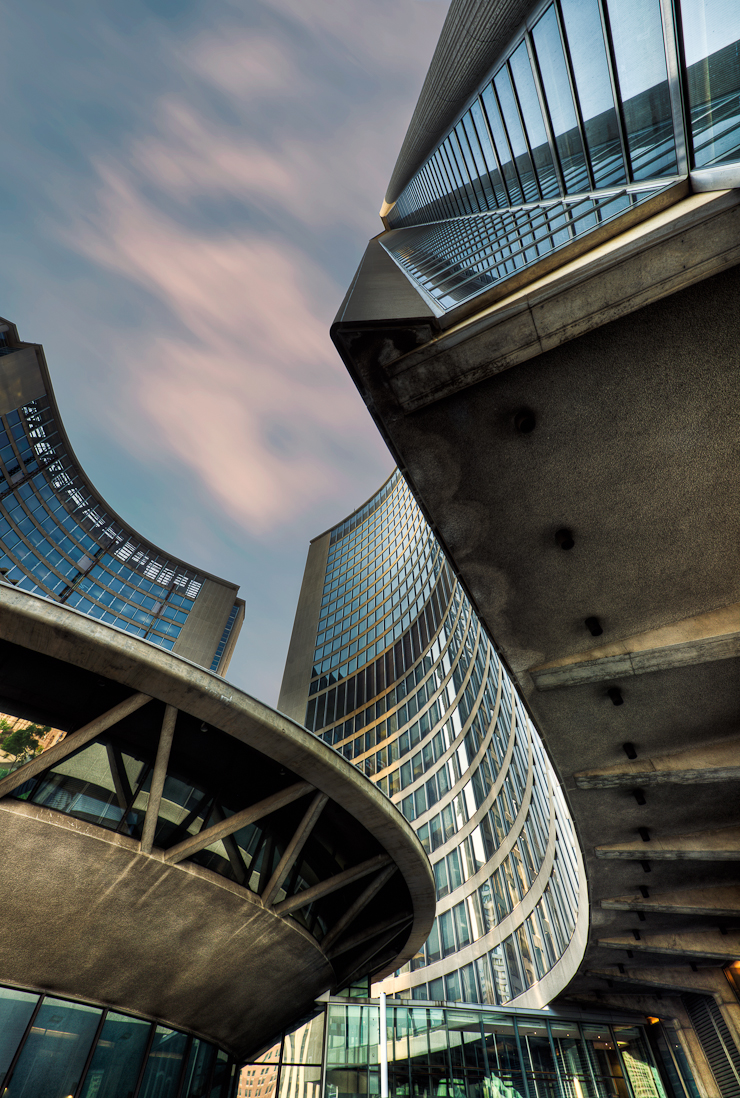
2. The Twist

Taken at Toronto’s City Hall, my goal was to capture the modern and forward thinking architecture of the building despite it being over 40 years old. The building is one of the landmarks of Toronto and has been shot to death so I looked for some angles and compositions that would bring a fresh perspective to it. The colorful HDR processing served to further play up the modern feel and resulted in what is now one of my favourite architectural images. The corkscrew effect created by the verticals in the windows seem to draw me into the image every time.

Toronto City Hall

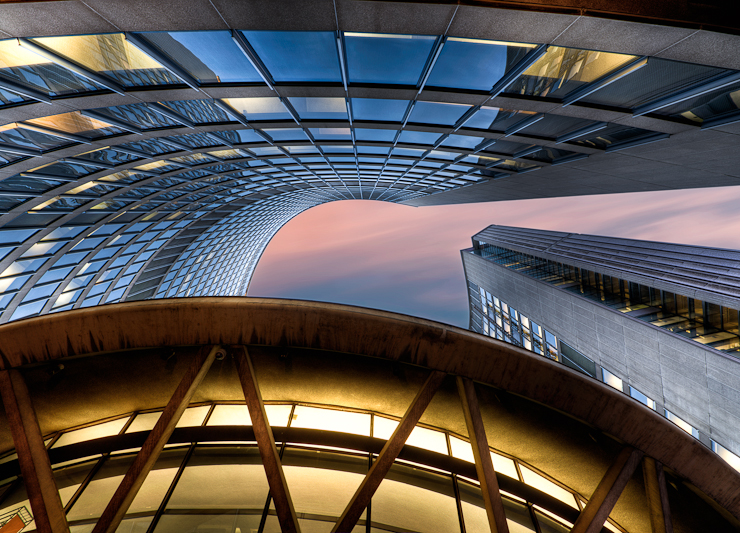
 3. Spiral Hall

This was taken at a yet another visit to Toronto’s City Hall, this time with the goal of emphasizing the buildings height. Wandering around with the viewfinder glued to my eye, I stumbled across this rather unique and multi-dimensional view of the structure. I shot this from a nice low angle and the rest was down to processing to give it the modern feel I wanted. I really like the mixture of sweeping curves and leading lines created by the building and the way it shows the building as being both old and modern at the same time.

Toronto City Hall

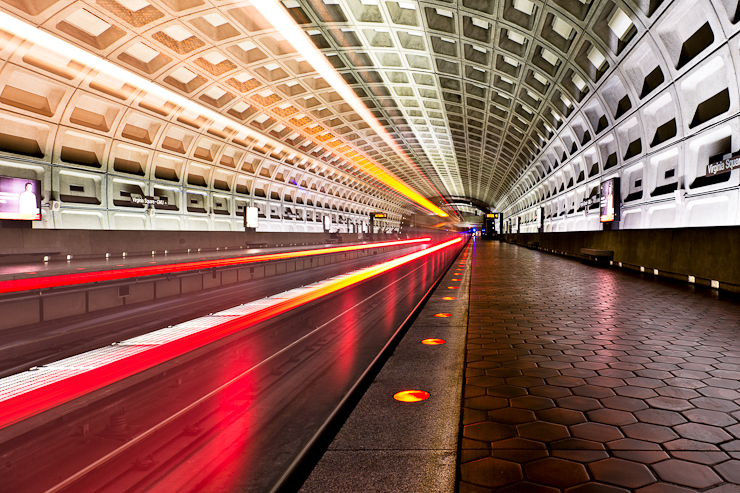
4. Subway Light

On my first visit to the DC Metro, I ended up leaving my camera at home and immediately regretted it. The system was awash in unique architecture, repeating patterns, vanishing points and interesting lights. Upon returning to the hotel, I immediately grabbed my camera and tripod and made a dash back to the nearest subway station. After about an hour of shooting various angles, locations and composition I was (not so politely) kicked out but not before capture this lucky image. Having seen the potential for it I set my camera on a tripod right near the edge of the tracks and awaited the trains arrival. Lucky for me, I timed the shutter release well and the image looked good after the first try. What I like about the resulting image is the way that the light trails seem to be encased by the ceiling and the sense of proximity to the train that I feel each time I look at it.

Washington DC Metro

5. The Walt Disney Concert Hall

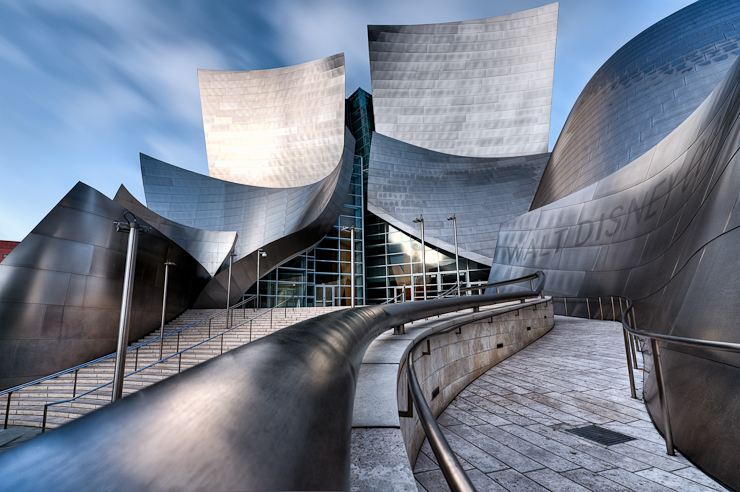
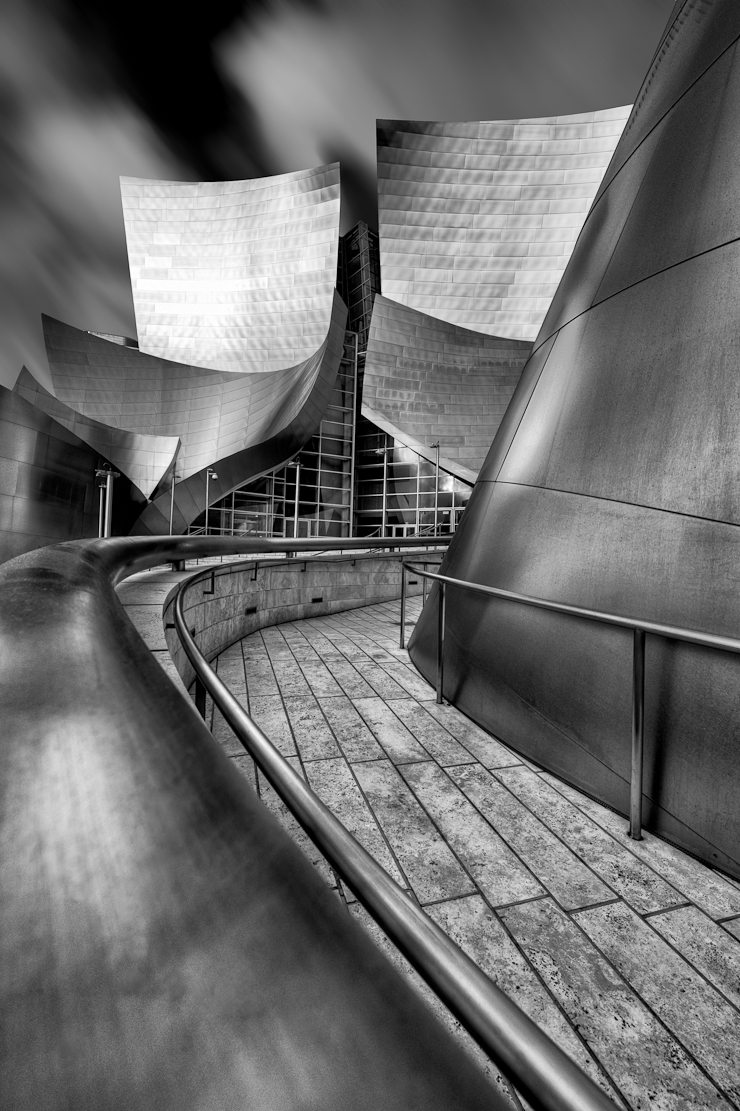
I find it too difficult to choose between the vertical B&W and and horizontal color versions of the image so I’ll include both. I was lucky enough to have the B&W version included in the Feb 2013 issue of Digital SLR Photography magazine so it most certainly had to be included here. Of all the things to photograph in Los Angeles, the Concert Hall was at the top of my list. After about an hour of shooting what felt like fairly typical images of the building, I took my camera off the tripod and found the railing that served as the kicking off point for the entire image. I like the way the railing draws me into the building and the way the metallic texture of the building comes across in both the color and B&W versions.

Walt Disney Concert Hall - Frank Gehry, Los Angeles

Walt Disney Concert Hall - Los Angeles

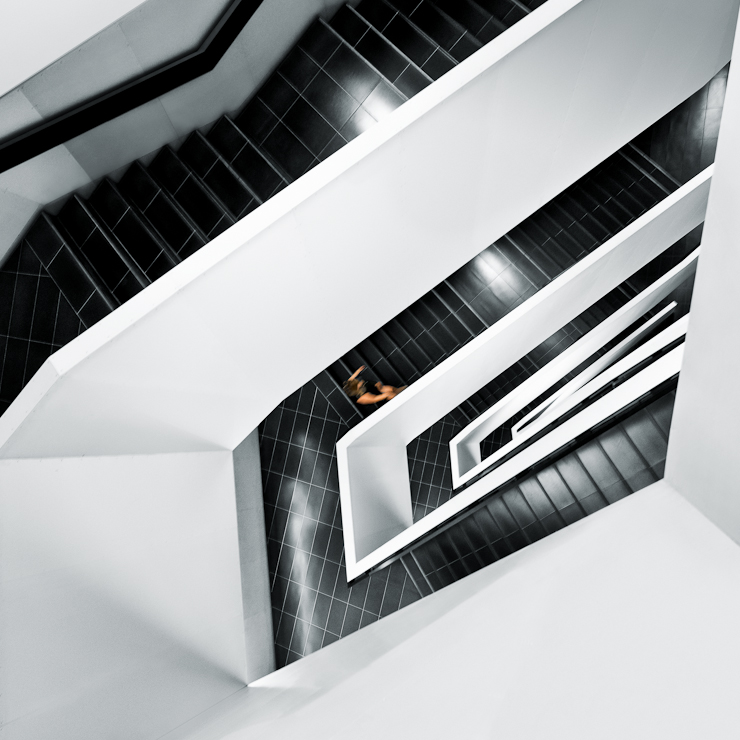
6. The Labyrinth

Also shot at the Royal Ontario Museum in Toronto, this image is has long been a favourite of mine due to it’s fairly simple color palette and minimalist feel. The mixture of black and white, disrupted by the single person walking make for what I think is a cool and unique image.

Royal Ontario Museum - Toronto

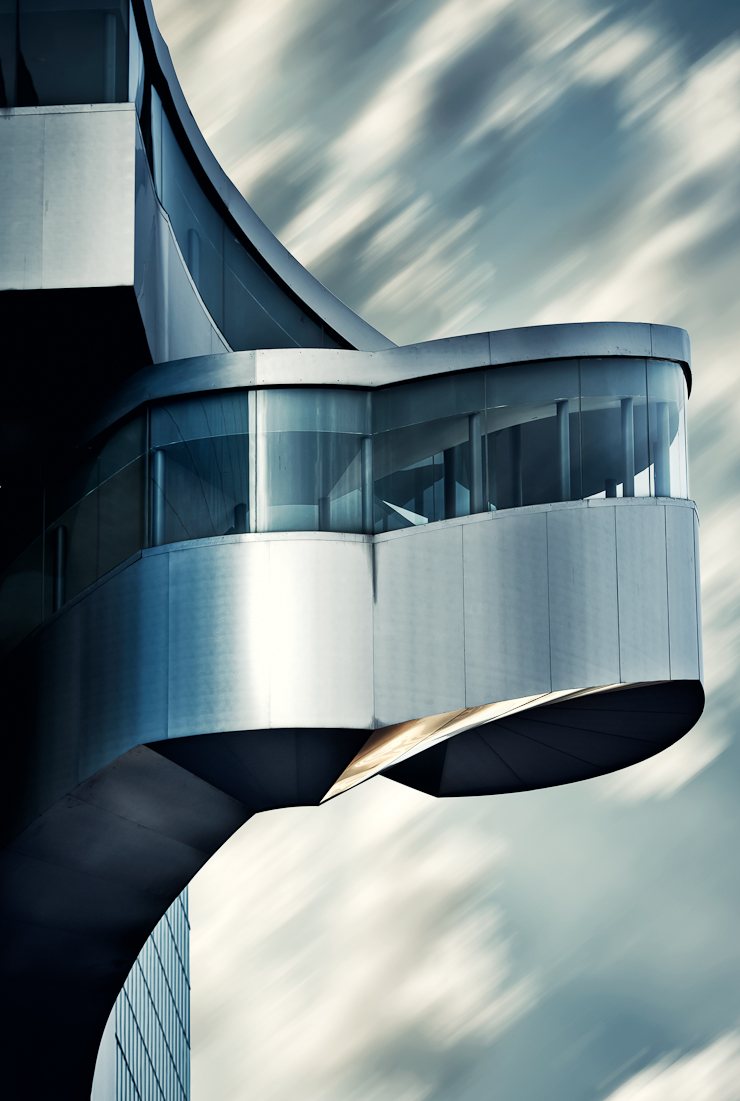
7. Stairway to Heaven

Shot on the exterior of the Art Gallery of Ontario, I like this image simply because of the uniqueness of the structure and the way it is set against the blurred sky. The blue and metallic tones help to play up the modern nature of the building and I feel represent the vision of it’s architect -Frank Gehry – quite nicely.

Art Gallery of Ontario - Toronto

8. Beverly Hills Style

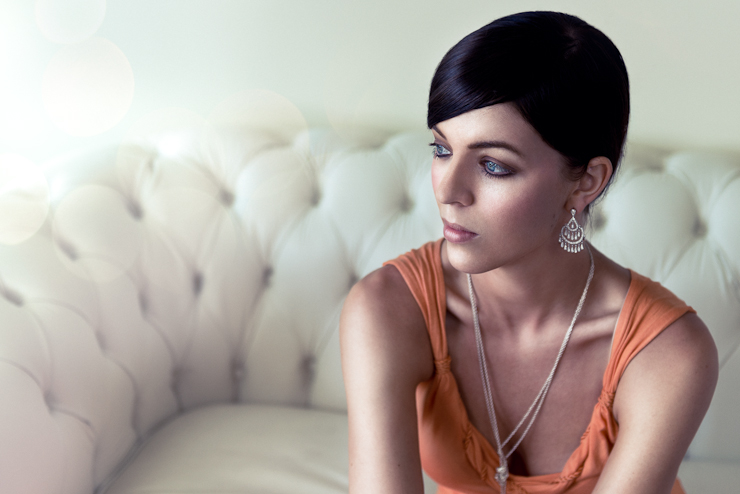
The light tones of the room and simple yet beautiful couch at the Mr C hotel in Beverly Hills immediately drew me in as a great spot for a portrait. The details of the shoot can be found in this post so I won’t elaborate on them here. What I love about the image is ethereal feeling within it and the color contrast between the models skin tone, dress and surroundings. The off to the side gaze adds a further sense of mystery and keeps me lingering in the frame for longer than a straight on shot would.

Portrait - Los Angeles

9. Lindsey

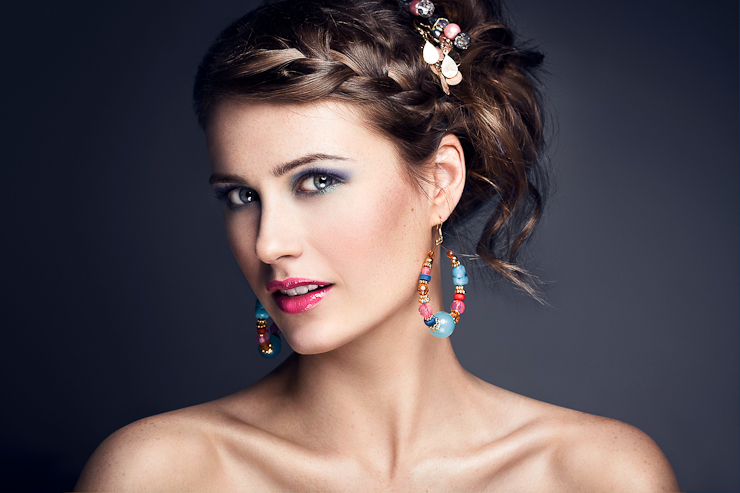
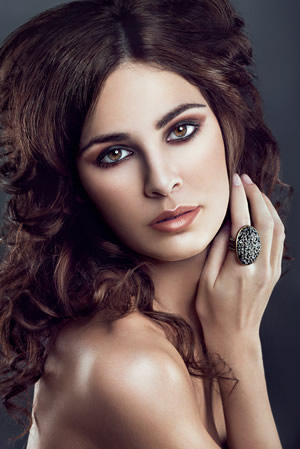
Shot as part of a beauty shoot, I simply like the mix of the vibrant make-up and accessories with the muted tones of the background and skin. The model’s great features and somewhat mysterious expression also go a long way towards making this image a favourite of mine.

Beauty Shot - Toronto

10. Brianna

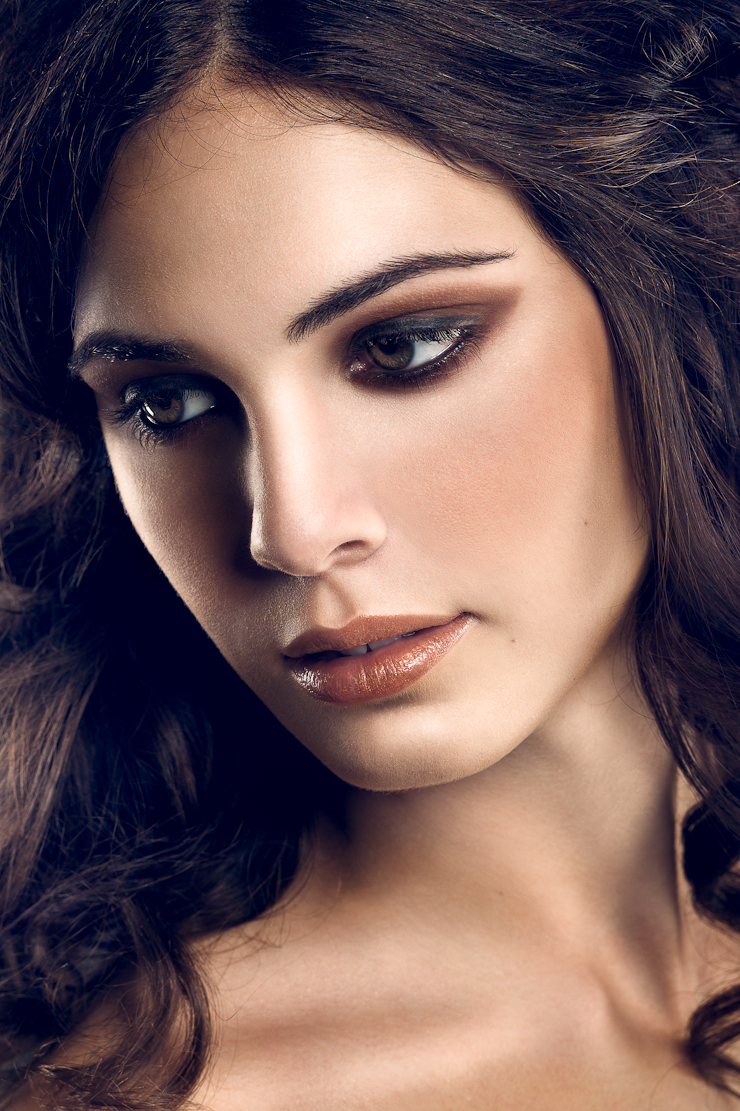
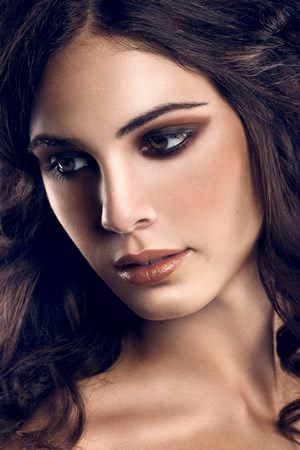
Also part of a beauty shoot, the image finds it’s way into my top 10 for a couple of reasons. The combination of highlight, shadow and highlight as you move from right to left creates a more interesting and unique – albeit less organic – image than a single light would. The model’s large eyes stand out nicely and the earthy tones of the her skin, hair and make-up form a cohesiveness within the shot. The tight crop also draws me into the model’s features and removes any distractions.

Beauty Shot - Toronto

I hope you enjoyed that round-up of images  for 2012, and with any luck I can bring you an even better set for 2013.

The post 10 Best Photos of 2012 appeared first on Vibrant Shot Photography.

Mastering Color Adjustments in Photoshop

$
0
0

In this video tutorial I’ll be covering the various ways that you can adjust the color of your images. There are countless ways to adjust colors within Photoshop so here I’ll be looking at 6 approaches that I use on a daily basis within my images. The tools shown here will work equally well for fashion, portrait, landscape, architecture and all other types of images. Some of the topics covered include:

  • Curves adjustment layers
  • Levels adjustment layers
  • Selective color adjustment layers
  • Gradient map adjustment layers
  • Hue/saturation adjustment layers
  • Color casting with fill layers
  • Apply image tool and mask fine tuning

These tools are available in Adobe Photoshop CS3 and onward.

Thanks for watching and don’t forget to subscribe to my YouTube channel for more updates.

The post Mastering Color Adjustments in Photoshop appeared first on Vibrant Shot Photography.

Building a Facebook Following for Photographers

$
0
0

A little while back I wrote about using Facebook advertising in an effort to increase the number of likes on your Facebook page. My findings for advertising were generally negative and I promised that I would follow up with some alternative ways to help boost your Facebook following organically. If you haven’t read the previous post already, I urge you to do so here in order to get an idea of what we’re really after when collecting page likes. While I’m not a social media “guru”, “wizard”, “expert” or “specialist”, I have found certain tactics more effective than others for increasing your following and that’s what I’ll be sharing with you here.

1. Content is King

Although I’ve seen many Facebook pages with less than stellar photos amass a sizeable following, the single best way to get lots of followers is to provide high quality content. In our case this includes great photos, useful techniques and original content. In today’s age there’s no shortage of good photos and interesting articles to grab your audience’s attention and in order to compete, you too have to be compelling and interesting. Unfortunately this one is the hardest to implement as it requires time commitment, skills and discipline. Skills will develop over time so expect your content to improve, but it’s the discipline aspect where most of us fail.

2.  Utilize other Sources

If you simply put your Facebook page up and expect users to arrive in droves with little else, you’re sadly mistaken. One of the best ways to increase your follower count is to include your Facebook page information everywhere you can. Examples include Flickr, 500px, 1x, your website, etc. For example, every photo that I post on 500px has my Facebook link included in the photo description. With nearly 150,000 photo views on 500px, this is a great and free source of traffic to my Facebook page with about a 0.2% conversion rate. What this means is that for every 500 views I’ll average 1 Facebook like. This may not seem like much but with 150k views, that’s 300 likes, and those users are typically highly engaged with my content, making them all the more valuable. When using external sites, be sure to include a clickable version of your Facebook URL as opposed to just the URL text. Too often I see photos that state the Facebook URL but I have to copy and paste it into the address bar to get there. The harder you make it for people to get to your page, the less they’ll do so. It requires only a short line of HTML code to put a clickeable link in and it can increase your visitor rate dramatically.

3. Use Other Pages

While I’m strongly against spamming other peoples pages with image posts and links, some pages are intended for just this purpose. There are photo aggregation and publication pages that allow you to submit your photo, and if selected, gets posted to their page feed. These pages often have followers in the 5,000 to 100,000 range so your photo’s reach becomes quite large if accepted. Some examples of these pages include ArtFreelance, MegaShot and JC & A Elite. You can also visit camera manufacturer pages and magazine pages which also allow you to submit your own photos and run contests on a regular basis. As an example, when a photo of mine is posted on MegaShot, I’ll typically gain anywhere between 15 and 50 new likes on my page, depending on the popularity of the image. Again, this relates back to point 1 – creating high quality content – because if your images aren’t strong, it will never get published and this won’t work.

4. Post Often, Just Not Too Often

You have to keep your followers engaged and get your name out there consistently, but don’t overdo this. Don’t just post content for the sake of it as people will begin to block your feed or even un-like your page altogether. If you have amazing content 3 times a day then post 3 times a day, if you don’t then scale it back. I would aim to post 3-4 times a week with a mix of images, videos, behind the scenes, and tutorials. Of course images tend to attract the largest number of views, likes and shares so focus your efforts there, but don’t neglect the other stuff either.

5. Engage Dammit!

A “like” is nothing more than a vanity metric if it’s not combined with engagement. We want our users to interact with our content, not just like our page once and move on. Too often I see page owners failing to recognize that this is a two way street. If you don’t engage with your followers, why would they engage with you? What I’m referring to here are things like responding to questions, thanking your users, liking their comments, etc. I see so many pages where questions are left unanswered and comments disappear into the void. Conversing with your followers greatly increases the chances that they will like your content in the future, simply because they’ll like you! On the flip side, consistently ignoring people breeds resentment and having them view you as a self centered and faceless individual.

On a similar basis, be the one to go out and start conversations yourself. Visit some of the above pages like MegaShot and ArtFreelance and make comments on peoples photos, but comment from your page name, not your personal page. One thing I will emphasize here is the importance of being genuine and helpful. Leaving a comment like “good” or “!!” is hardly constructive or helpful and makes it seem like you’re only commenting to help yourself. Tell the person what it is that makes their photo good in a detailed and well thought out manner.

6. Wait

Even if you do all the above things, the number 1 way to gain more followers is to give it time. If you had 100 stellar photos and posted them all in one day, you won’t get nearly as many followers as you will if you slowly and organically build an audience for your content. By focusing on engagement, each photo you post will steadily be seen by a larger and larger audience which in turn further exposes your page to others and leads to more followers. Dumping all your content in one day misses out on all this so consider your timing and know that it’s a marathon, not a sprint.

We’re lucky as Photographers because people love seeing good photos. For other types of businesses or topics, building a following is much harder than it is for us. Despite this advantage, we shouldn’t let that make us complacent. Just like anything else, it takes time, effort and dedication to build a strong and loyal following and hopefully the above tips will help maximize your potential.

If you have suggestions of things that have worked for you that I’ve missed, please discuss them in the comments below.

The post Building a Facebook Following for Photographers appeared first on Vibrant Shot Photography.
Blending Multiple Exposures in Photoshop

$
0
0

In this video tutorial I’ll be discussing some of the tools available in Photoshop to help us blend together one or more exposures without the use of HDR tools. The reason I often like to blend exposures manually is that it gives me more control of the specific areas being blended and tends to produce a more natural and less noisy looking image than traditional HDR processing does. Some of the tools that will be discussed include:

  • Image alignment
  • Channels based selection and adjustment
  • Layer blend-if
  • Apply image

These tools are available in Adobe Photoshop CS3 and onward.

Thanks for watching and don’t forget to subscribe to my YouTube channel for more updates.

The post Blending Multiple Exposures in Photoshop appeared first on Vibrant Shot Photography.

Creating Beautiful Hair Highlights in Photoshop

$
0
0

In this video tutorial I’ll be covering some techniques for making hair highlights in your portraits look beautiful. Rather than just enhancing the highlights, we’ll also be discussing how to deal with common issues that arise when shooting dark haired models. Some of the tools that will be discussed include:

  • Layer blend modes
  • Channels based selection and adjustment
  • Layer blend-if
  • Color adjustment methods

These tools are available in Adobe Photoshop CS3 onward.

Thanks for watching and don’t forget to subscribe to my YouTube channel for more updates.

The post Creating Beautiful Hair Highlights in Photoshop appeared first on Vibrant Shot Photography.

Lighting Effects and Composite Blending

$
0
0

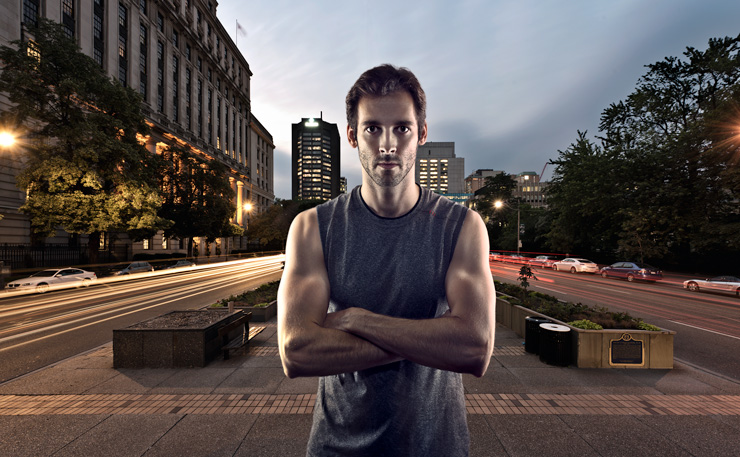
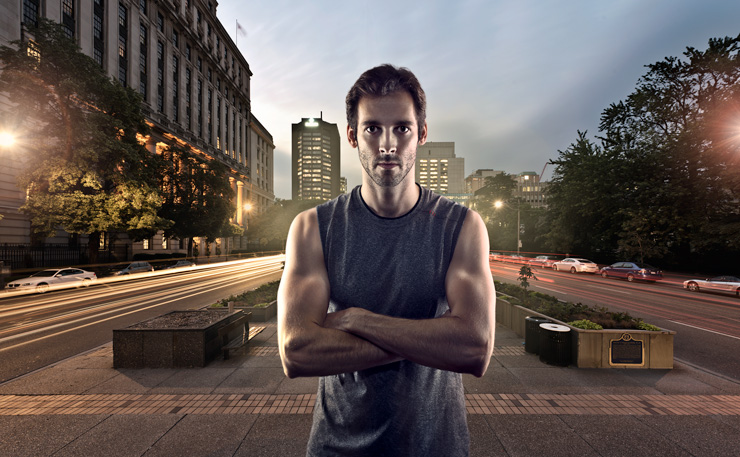
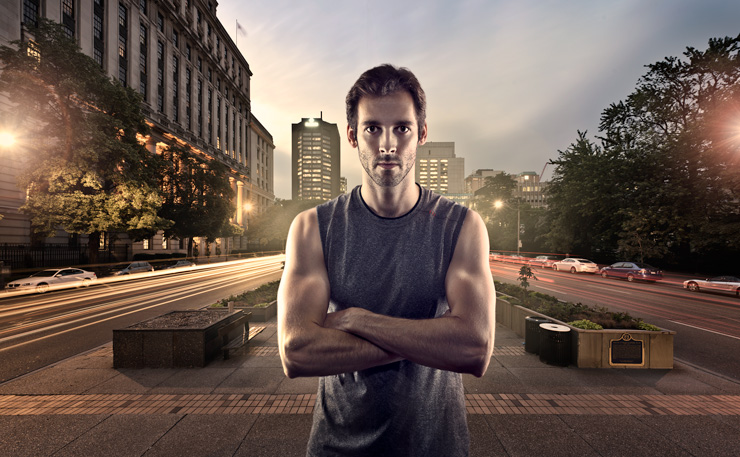
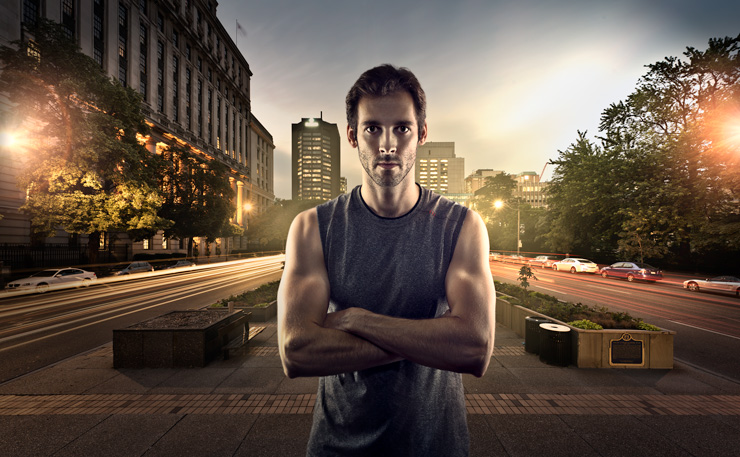
In this fairly extensive video tutorial I’ll be covering a variety of ways to enhance and add lighting effects to your image. In the case of composites, we’ll look at some ways to use light and coloring to make them look a bit more believable and improve the blend between the subject and background.

We’ll start with the above composite image and work through three separate variations of it so you can choose an approach that looks best to you.

In the above version we’ll make some subtle adjustments to the lights to help the subject fit more naturally into the background and accent the light sources that exist.

In the second variation we work towards making the subject stand out better and draw the viewers attention into the key areas of the image. We also make some color adjustments to even out the tone between the subject and background.

In the final variation we’ll look at making some dramatic adjustment to the feel and lighting in the image using Photoshop’s built in Lighting Effects tools. For this one you’ll want to download the lighting present that I used in the image to serve as a starting point if you want to try it on your own image. Note that while the above adjustments can be done using Photoshop CS3 onward, this final variation requires CS5 or higher.

Some of the tools that will be discussed include:

  • Layer blend modes
  • Creating and adjusting lens flares
  • Painting light glows
  • Photoshop lighting effects filter
  • Color matching

Thanks for watching and don’t forget to subscribe to my YouTube channel for more updates.

The post Lighting Effects and Composite Blending appeared first on Vibrant Shot Photography.

Mastering Dodging and Burning: 4 Techniques for Beautiful Photos

$
0
0

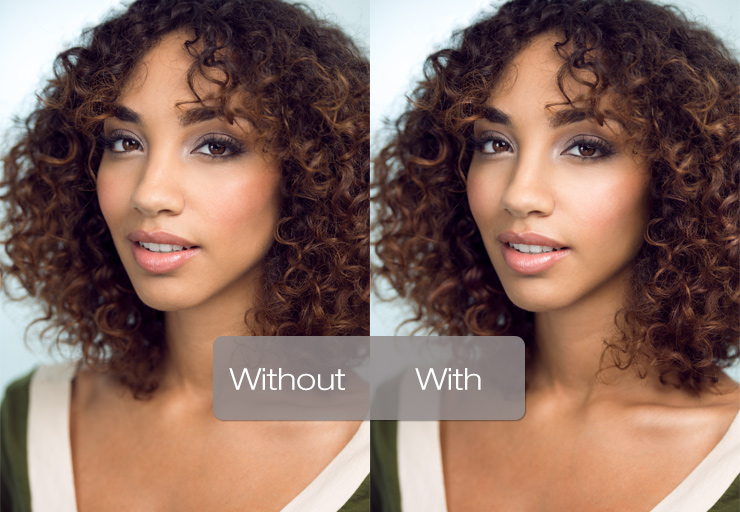
In this in-depth video I’ll be taking a somewhat different approach to demonstrating dodging and burning. Rather than cover the actual painting aspect of dodging and burning, I’ll be focusing on 4 different approaches and discussing which is best suited for various situations, the best practices for each and the limitations that come with them. The video is beginner to intermediate in nature and will work with Photoshop CS3 and onward.

A subtle example of before and after dodging and burning can be seen above. The process for dodging and burning the above image took no more than 5 minutes.

Some of the tools/techniques that we will be using include:

  • Layer blend modes
  • Curves adjustments
  • Frequency separation including the ‘apply image’ tool
  • Dodge and burn tools
  • Layer blend-if

As promised, the actions for creating some of the bases for the dodging and burning techniques we discuss in the video can be found here.

Thanks for watching and don’t forget to subscribe to my YouTube channel for more updates.

The post Mastering Dodging and Burning: 4 Techniques for Beautiful Photos appeared first on Vibrant Shot Photography.


Creating Realistic Starburst Effects in Photoshop

$
0
0

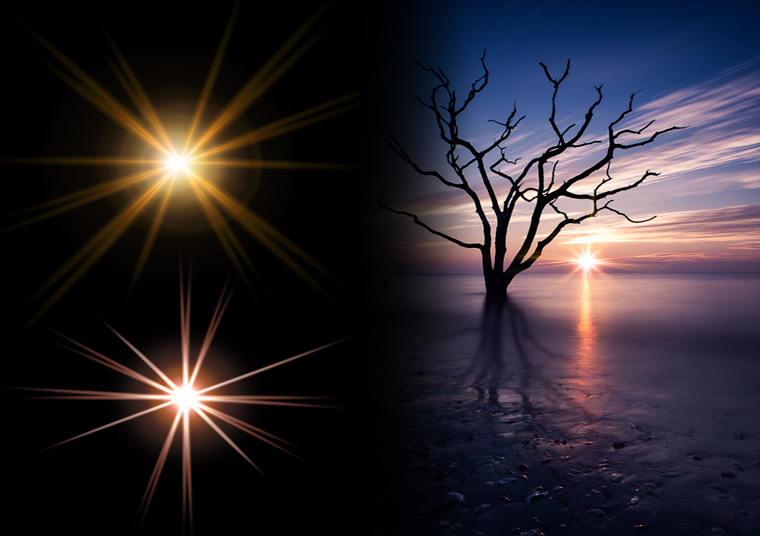
In this video tutorial we’ll be mixing photo editing and graphic art to create our own starburst lens flare effects and appling them to an image. You don’t really need any sort of graphic skills to do this as the process mainly involves manipulation through scaling, rotating and applying filters. The whole tutorial can be completed on Adobe Photoshop CS3 and onward.

The above is an example of the sort of texture we’ll be creating and inserting into a final image. 

Some of the tools/techniques that we will be using include:

  • Layer blend modes
  • Levels adjustments for texture layers
  • Transforming and selecting with constraints and reference points
  • Warp tool
  • Blur and sharpening tools like radial blur, Gaussian blur and unsharp mask.
  • Color manipulation with hue/saturation

As promised, three sample starbursts are provided for you to download and you are free to use them wherever you like. Just insert them into your image, scale them appropriately and change the blend mode to “screen” as shown in the tutorial.
Starburst 1, Starburst 2, Starburst 3

Thanks for watching and don’t forget to subscribe to my YouTube channel for more updates!

The post Creating Realistic Starburst Effects in Photoshop appeared first on Vibrant Shot Photography.

Beauty Photography – Costs and Scheduling

$
0
0

What’s there not to love about taking beauty shots? You spend the day with a talented team of individuals and take photos of beautiful models. In this two part post we’ll be delving into the key elements of a beauty shoot, their costs, how to schedule your day, common lighting configurations and briefly discuss retouch. If you’re looking to add beauty photography to your portfolio, this should serve as a good guide to get you started. Part one will deal with the key elements, the costs and the schedule of your day, while part two fill focus more on the lighting and post production side of things.

Let’s begin with the elements that are critical to a beauty shoot:

1. A Great Model
This is probably the most important part in the success of your shoot. If you have a model with great facial features (eyes, lips) that has experience and can deliver one great expression after another, you’re 50% of the way there. While it may be tempting to opt for a free model on a site like Model Meyhem, I’d advise against it. Approach some smaller modelling agencies and let them know that you’d like to test with one of their newer faces. If you have at least a decent portfolio of portraits or fashion shots already then you can often get a model either for free, or for around $50-$120 for half the day. Trust me, it’s worth the money given how much time and effort you’ll invest in the rest of the shoot.

2. An Experienced Make-up Artist
This is the second most important thing, and much like your model, don’t skimp and look for the first free one you can find. Make-up is a huge component of the end result and will save you hours of retouching time, so save up and hire someone that has experience with beauty make-up. The cost for half a day will range from $100 – $200, depending on their experience and location.

3. A Good Hairstylist
If your shoot involves sophisticated hair, get a dedicated hairstylist. Much like the make-up artist, great hair can really take your photos to another level. Prices are similar to what a make-up artist would charge. If your concept requires relatively simple hair styling, you can often find a make-up artist that can do the hair as well. Typically their rate will be slightly higher but will still cost less than hiring hair and make-up separately.

4. The Right Gear
As so many people say, it’s not the gear that makes a photo, it’s the photographer. While this is often true, in beauty photography the gear does matter to an extent. While you can shoot beauty with a fairly low budget SLR and decent quality glass, you will need to have the right light shapers and tools for the job. You’ll ideally need 2-4 lights with a variety of shapers which we’ll dive into in the next part of this article. As far as camera gear goes, I use my Nikon D800 + Nikon 70-200mm f2.8 VRII lens for all my beauty shots. The longer focal length creates a flattering compression to the face so opt for a lens that is at least 105mm+. If you’re shooting details like eyes or lips then a 105mm macro lens is also a great choice. A tripod is helpful if you want razor sharp images or if you’re shooting with a heavy lens like the 70-200 f2.8 (your back will thank you).

5. A Concept or Mood Board
Your make-up artist, no matter how experienced, will need to have a direction to go in. You’ll need to communicate your goal and concept for the shoot so be prepared with your color scheme and some sample images for them to go off of. Do you want glossy or matt make-up? What elements of the model’s face are you trying to accent? Is the make-up the focal point, is it the model, or is it a piece of jewellery?

6. An Assistant
Find a friend to help you with the shoot and you’ll have someone to bounce ideas off of and save yourself a lot of stress. When getting your lights fine tuned, you can use your assistant as a stand-in and also have them make minor adjustments as the shoot goes on. It also helps to have a second pair of eyes looking out for things throughout the day.

7. A Studio
You can shoot beauty shots in pretty much any enclosed space but a studio is obviously the default location. You don’t need any windows in the studio and a 12′ x 16′ space or greater is ideal. You could make do with a smaller studio but then your control of background lighting will become more challenging and more light will be bouncing around. If you’re working in a smaller space then be sure to have some black v-flats or flags to help control your light and reflections.

8. A Great Retoucher
Beauty photography is all about perfection so if you don’t believe in retouching then you should probably look towards another genre. It is as much about the retouch as it is the in-camera technique so a poor retouch will completely wipe out any effort you made during your shoot. A good retoucher will ensure that all your skin texture is maintained while making the model look absolutely flawless and magazine ready. If you’re already experienced with Photoshop then you can certainly retouch your own images, but if spending 4 hours obsessing over every detail and strand of hair isn’t your cup of tea, then you may want to have someone else do it. I highly recommend that you at least learn how to do it yourself so you can give better direction to a retoucher, but it’s not a requirement. If you’ve got a good portfolio you may be able to find a retoucher willing to do it on a time for print basis but generally, for non-commercial purposes you’ll be looking at anywhere from $80-$120 per photo, depending on the extent of the retouch. Typically you’ll get a discount for multiple photos and it’s best to look for retouchers in Eastern Europe where rates are lower but quality of work is still exceptional.

Now that we have all the elements in place, let’s talk schedule. If you’re shooting beauty to build your portfolio, I would recommend scheduling two models and plan for a 6 hour day. If you plan things well in advance, you can get two models photographed and still only pay for a half day for hair and make-up. A shoot with two models would break down like this:

  • 9:00am, arrive at studio, get gear unloaded
  • 9:30am, first model and hair stylist arrive, start hair, get gear set up
  • 10:00am, hair is done, make-up artist arrives
  • 10:45am, make-up is done, start shooting
  • 12:15pm, finished shooting, take a lunch
  • 12:45pm, next model arrives, begin hair, set up lights for next shoot
  • 1:15pm, hair-stylist is done, hair can leave, make-up begins
  • 2:00pm, make-up is done, start shooting, make-up artist can leave
  • 3:30pm, that’s a wrap

While it’s ideal if the make-up artist and hair stylist can stay throughout the second shoot for touch-ups, if the budget is tight you can make do without. You’ll notice that 1.5 hours has been budgeted for shooting each model. While this may not seem like much time, it’s actually enough to shoot 3 different lighting set-ups if working with an experienced model so don’t over budget time for this. The model won’t be able to give you her best for hours on end, so have your lighting relatively well dialed in and be ready to shoot when make-up is done.

So that concludes the first part of our beauty photography discussion. With the plan and logistics in place, we’re ready to move to shooting and editing which will be the focus of the next post.

The post Beauty Photography – Costs and Scheduling appeared first on Vibrant Shot Photography.

Creating Reflections and Aurora Processing in Photoshop

$
0
0

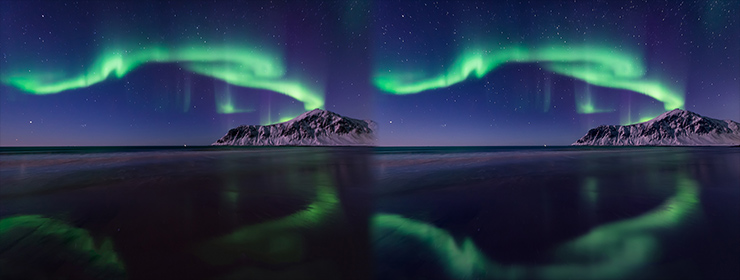
This weeks tutorial will feature the beautiful work of my friend Nagesh Mahadev who took this amazing shot in Northern Norway. For those that haven’t seen his work, be sure to check out his incredible set of landscapes on his 500px and Facebook pages.

While our focus will be to punch up the reflection of the Aurora, we’ll also be making some sharpness and color adjustments along the way. The steps taken here can be completed using Photoshop CS5 and onward with most tools available in CS3 and beyond.

The above is a before and after of what we’ll be going through in the video. 

As we work through this image we’ll be looking at the following tools:

  • Two approaches to creating reflections, one common one, and one better one
  • Channels based selections
  • Two types of selective high pass sharpening
  • Creating horizon glows with linear dodge layers
  • Selective color adjustment
  • Crop and straightening tools
  • Extending images

Thanks for watching and don’t forget to subscribe to my YouTube channel for more updates!

The post Creating Reflections and Aurora Processing in Photoshop appeared first on Vibrant Shot Photography.

Modifying & Removing Make-up with Frequency Separation

$
0
0

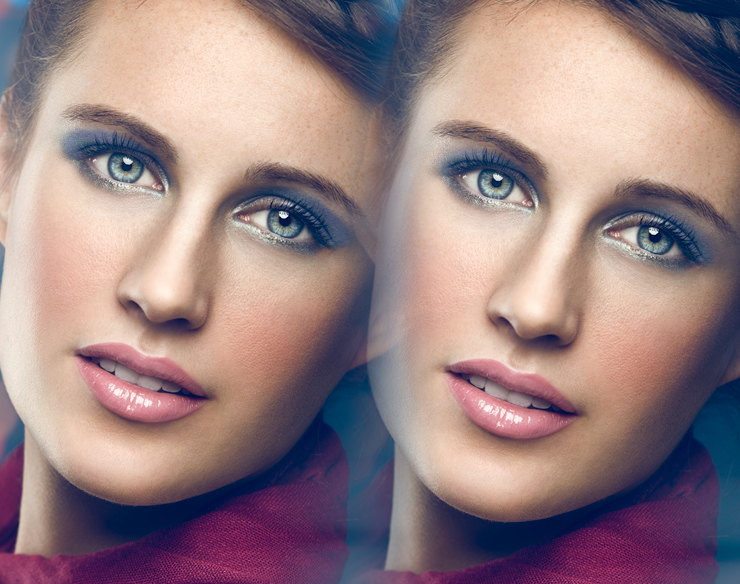
This week we have a quick video tutorial on changing make-up – in this case eye shadow – using frequency separation. While frequency is typically used for retouching skin, the technique can be incredibly useful when making drastic color changes such as this one. In a nutshell, we’ll be replacing eye shadow with skin tones in order to make the make-up more subdued.

While I wholeheartedly agree that it’s easiest to just get this right before taking the photo, sometimes things just fall through the cracks and we have to fix them in post.

The above is what we’ll be trying to achieve in the video. The critical element is to maintain skin texture while completely replacing the color. Frequency separation is perfect for just this sort of thing. 

Thanks for watching and don’t forget to subscribe to my YouTube channel for more updates!

The post Modifying & Removing Make-up with Frequency Separation appeared first on Vibrant Shot Photography.

Photoshop Blend Modes for Photographers

$
0
0

This week we bring you an in-depth, two part video covering nearly all (the actually useful ones) the Photoshop layer blend modes along with examples of typical scenarios where you would use them. We’ve approached the subject from the standpoint of photographers and retouchers so the examples given will be reflective of that. All examples and blend modes will work in Photoshop CS3 and onward.

In this first part we’ll cover the following blend modes in depth:

  • Normal, Dissolve
  • Darken, Multiply, Color Burn, Linear Burn, Darker Color
  • Lighten, Screen, Color Dodge, Linear Dodge, Lighter Color

In Part 2 we wrap up with the remaining blend modes including:

  • Soft Light, Overlay, Hard Light, Vivid Light, Linear Light
  • Difference
  • Hue, Saturation, Color, Luminosity

Pin Light, Hard Mix, Exclusion, Subtract, and Divide are skipped because they’re either obsolete or not very useful to photographers

Thanks for watching and don’t forget to subscribe to my YouTube channel for more updates!

The post Photoshop Blend Modes for Photographers appeared first on Vibrant Shot Photography.

Beauty Photography – Lighting and Retouching

$
0
0

In part 1 of this two part post on beauty photography we covered the details of organizing and budgeting for shoot day. In this part we’ll be focused more on concrete techniques such as common lighting configurations, camera settings and briefly discuss some important retouching techniques and steps.

In Camera Technique

As far as camera settings go it’s pretty simple. You’ll want to use a focal length in the range of 100-200mm (a 70-200mm f2.8 is usually a good choice) to achieve a flattering facial compression, or a macro lens if shooting facial details. If you’re just getting started then a run of the mill 70-300 lens will work just fine given the apertures we’ll be working at. ISO will always be at the lowest native setting and a small aperture (f/11, f/16) is typically used to get a wide depth of field and reveal lots of detail. Shutter speed will be in or around your flash sync speed of 1/160th to 1/250th so you can pretty much set it and forget it. With those settings largely fixed, all that’s left is to adjust your strobes to the correct ratios to achieve the right exposure and effect, which you can do with trial and error, or a light meter. Pretty much any modern DSLR will perform great so there’s probably no need to rent a Hasselblad H5D with a 60mp back.

Lighting

Lighting for beauty photography follows that of standard portraiture but you’ll typically (not always) be going for a fairly bright, high key and relatively shadowless look. There are a myriad of lighting configurations with the most basic being one light, all the way to a complex six strobe setup. We’ll begin with a one light approach which serves as a good starting point if you don’t happen to have 6 strobes lying around, but you’ll ideally want 2-3 strobes to achieve a good and professional look.

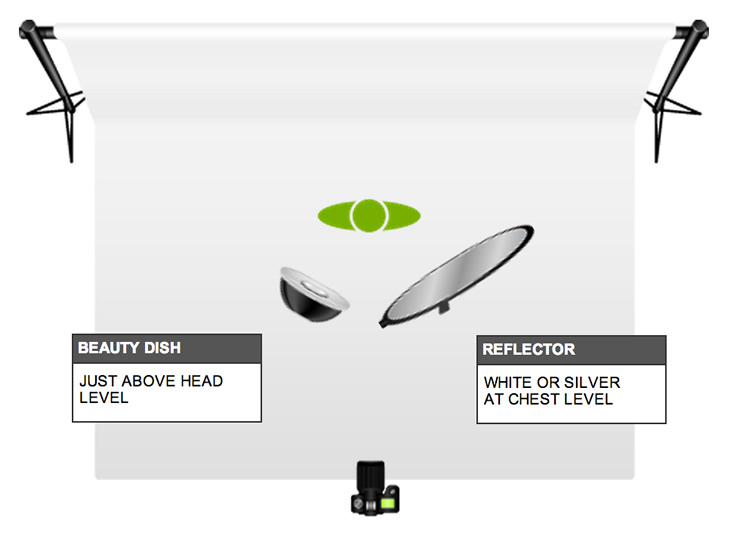
The above configuration is far from ideal as it relies on placing your subject close to the background and using the main light as a background fill. It will result in a bit of shadowing on the face but that can largely be mitigated by strategically positioning your reflector (or reflectors). The main light as is common in beauty photography is a beauty dish, with or without a diffusion sock over it. Typically I will use a 17″ beauty dish but in a single light configuration you’ll be better off with a large 24″ version to help spread the light a bit and also give you a softer light. If you have a small Octa then this can work as well if you pull the front diffusion material off and put a reflector pan inside it. Power is easy to set since your shutter speed and aperture are largely pre-decided, so it’s simply a matter of selecting a mid-level power setting on your strobe and adjusting up or down until the proper exposure is achieved. You could of course also take an incident light reading using a light meter if you have one. Use a white or bright background so that it can pick up as much light as possible given that you’re working without a dedicated background light.

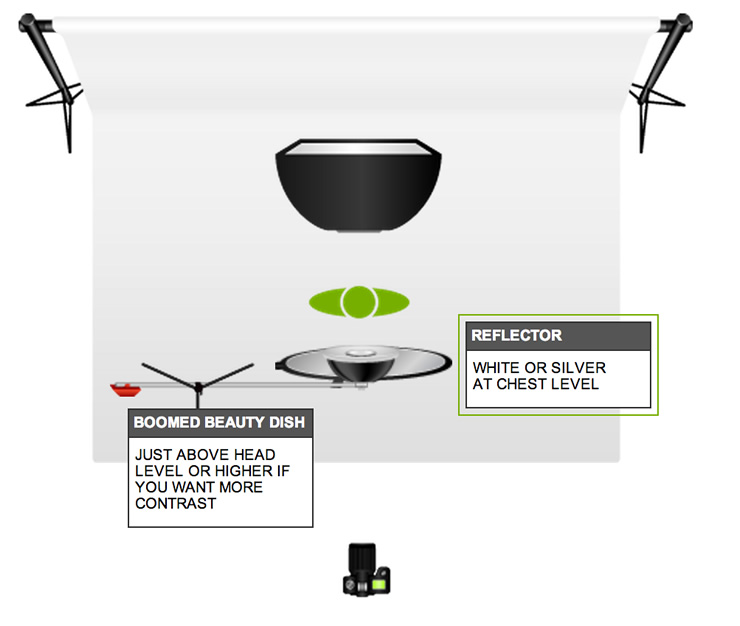
The above configuration is what you really want to aim for as a starting point. It requires only two lights and will produce a much better and more controlled result than the previous option. By having a separate background light we can eliminate shadows and set up our main light in a more typical clamshell configuration with a beauty dish more or less centred on our subject and a reflector at chest height. The beauty dish size doesn’t matter too much although larger is simply going to give a softer light and the reflector can either be silver or white, or simply a piece of foam core. A Lastolite triflector works best if you’re looking for a nearly shadowless and clean light but on a budget you can just take three pieces of white foam core and simply box your subject in with them. The background light doesn’t have to be a softbox. An umbrella, reflector, snoot, etc will all do the trick depending on how much light spread you are looking for. Set the power of your main light first without the background light and then adjust the background light to achieve the look you’re going for. If you see a lot of spill from your main light onto the background, simply bring your subject further away from the background. If you have a third light you can either use it to more evenly light your background by placing the background lights to the right and left of your subject, or replacing your reflector and using it as a fill light, as in the next configuration.

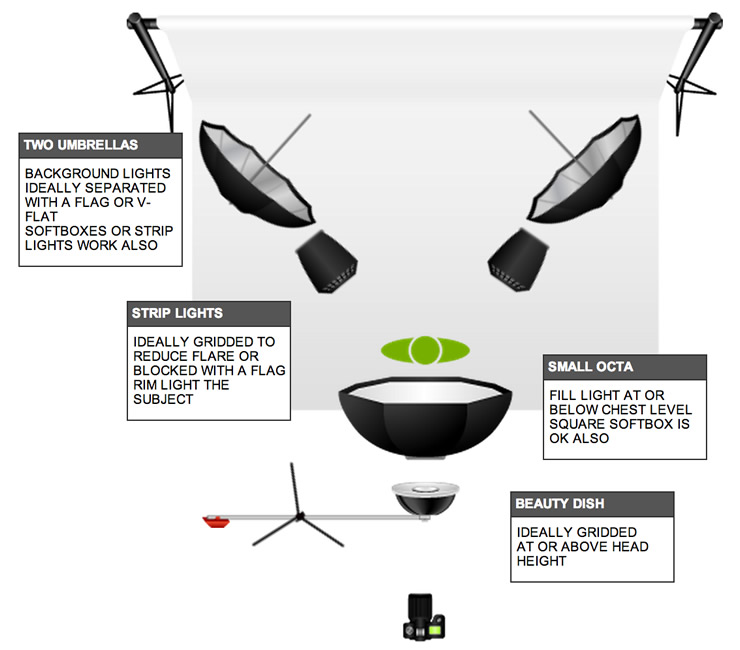
This final setup is on the extreme end, and you can use variations of this with just one or none of the rim lights behind the subject. I find that the rim lights create a really nice professional look so use them if you’ve got them. Essentially we’re creating a nice, symmetrical, bright look here and having control of each element without relying on reflectors. Once again the main light is in a clamshell configuration but instead of a reflector we’re using an Octa or softbox as our fill light. The ratio of main to fill is usually around 1:1/2 or 1:2/3 so experiment with those values to see what works best for you. If you’re looking for a bit more shadow you can drop the beauty dish a bit lower and loose the fill altogether (provided you have rim lights). The rim lights will be at a ratio between 1:1/2 and 1:1 of your main light, depending on the size of your diffuser and distance from the subject. For beauty you’ll typically want the rim light to be an accent and not to go too far into the cheeks. Be sure not to blow out skin detail on the cheeks so it’s better to be a bit too low in power than too high. Try your best to keep the rim lighting perfectly symmetrical or completely asymmetrical as anything in between will simply look sloppy. Often times a single rim light can look quite nice if you shift your main light to one side and place your rim on the opposite side. This can give a nice light-shadow-light sort of look across the subject’s face. For your rim lights you can use either strip lights (1′ x 3′ is fine) or you can use rectangular softboxes (2′ x 3′). Ideally your strip lights or softboxes will be gridded to reduce flare and loss of contrast but you can also place a flag (or gobo) between your camera and the rim lights to reduce this problem as well. Since grids are ridiculously expensive, the flag option is usually more economical. If you have black V-Flats then all the better. You can make do with a single light for the background but two will give you a more even distribution. Once again the background diffuser can be just about anything but avoid using bare flash heads as the light can spill onto your subject. Since there are lots of lights to adjust, work on adjusting your rim lights first and making sure that they don’t light too much of the side of the face and that they’re not too bright. Once those are set, dial in your main light, then try it with both the main and rim lights, and finally adjust your background light to taste. As you get into more complex setups like this, a light meter can be advantageous but isn’t necessary with a bit of practice.

You can use lots of variations of these three configurations so these are intended to serve as a starting point or road map. As far as equipment, 400ws strobes are more than sufficient so there is no need to splash out for 1200ws high-end equipment.

Retouching

Beauty retouching is essentially just portrait retouching taken to the extreme. If you’re new to portrait retouching then beauty is not the place to get your feet wet. In this case it’s best to hire a retoucher and have them do it for you. Be clear on what it is that you’re after. Provide samples of images that they can use as guides as styles can vary. Be sure to specify what it is that you’re looking to emphasize in the image. Is it the eyes, lips, hair, make-up, nails, jewellery, etc? Do you like a heavily dodged and burned look or do you want something more subdued and natural? Once again, a set of samples act as the best guide so be prepared with those. A beauty retouch can take anywhere from 3 to 8 hours so if someone offers to do it for $20, you’re probably going to get exactly what you pay for. Expect to pay from $80-$200 per image depending on the extent of the retouch and the retouchers experience. The number one thing that drives costs up is hair so fix it in camera by having a stylist perform regular maintenance during the shoot. Stray hairs and creating perfect strands can take hours and double or triple your retouching bill so keep this in mind.

Let’s say you have some experience in portrait retouching and want to go it alone. While it would be impossible for me to cover all the beauty retouching steps in this post, let alone one post, some key steps include:

  1. Get the exposure right through global or selective levels/curves adjustments. If you adjust this at the end you may find that certain elements were missed in the retouch, or they were darkened to the point where they didn’t matter anyway.
  2. Get your colors right (see my tutorial on color adjustments). Start with adjustments to skin tones, make-up, background etc. If the shoot is for a particular type of make-up or a piece of jewellery then be sure to keep those true to color (using a color checker passport or other tool).
  3. Use the liquify and warp tool to make the model look as good as possible. Remember in beauty photography you don’t get points for making the model look like herself. Drop the shoulders to lengthen the neck, smooth out bumps in the hair, enlarge the eyes, improve feature proportions (nose, lips), etc. Don’t overdo this of course, we want her to look human!
  4. Remove blemishes. Use the spot healing tool, healing brush and clone-stamp tool to tidy up acne, scars and any other imperfections. Freckles and moles are left to your discretion. In a portrait I would always keep them but again, with beauty anything goes. Do not use any sort of blurring or skin smoothing shortcuts!
  5. Even out the skin tone/texture. Use frequency separation to even out skin tone and create nice tonal gradations. By using frequency separation rather than clone-stamping you’ll retain all the texture and pores.
  6. Enhance features. This involves a bit of artistry as it can include anything from creating tight lip lines and highlights, to drawing in eyebrows and eyelashes. Commonly the Sclera (whites of the eyes) will get cleaned up, and the Iris will be selectively brightened (depending on the shot of course).
  7. Retouch the make-up by performing edge clean-up and blending. You can check out my tutorial for modifying make-up with frequency separation for more information.
  8. Add more texture using a grainy or pore simulating brush. This part is tricky and is usually where an experienced retoucher will shine.
  9. Dodge and burn. This is one of the most important things you can do and you can watch my tutorial on Dodging and Burning methods to help get you started. If hair is an important part of the photo then be sure to also check out my tutorial on making great hair highlights. You may also need to clean up fly-away’s and crossing hairs and this will take lots of patience.
  10. Perform selective sharpening on the eyes, hair, lips and jewellery. It’s important to sharpen with restraint and only on parts of the image so that artefacts remain at bay. Typically unsharp mask and high pass filter sharpening will work well.

While it’s impossible to cover everything involved in beauty photography in great deal within one or two blog posts, hopefully this article – and the previous one - will serve as good starting points and references for your next shoot.

The post Beauty Photography – Lighting and Retouching appeared first on Vibrant Shot Photography.

Understanding and Creating Luminance Masks in Photoshop

$
0
0

This week’s video is intended as a supplement to the multiple exposure blending video I posted a little while back. In this case we will go into more detail about what luminance masks are, how to refine them and how to create them from scratch without the need for any third-party actions.

A lot of the tutorials that I’ve seen out there seem to assume that you’ll be running an action and simply choosing from a collection of pre-created luminance masks to blend two or more exposures together. While this is a perfectly acceptable approach, I find that it takes only a few seconds to create your own mask and refine it to the specific image your working on without ever having to run an action for it.

The tools we’ll be working with in this tutorial are available across all versions of Photoshop CS.

Thanks for watching and don’t forget to subscribe to my YouTube channel for more updates!

The post Understanding and Creating Luminance Masks in Photoshop appeared first on Vibrant Shot Photography.


Fine Art Architecture Processing in Photoshop

$
0
0

In this week’s video tutorial we’ll look at creating dramatic, contrasty, fine art black and white architecture images using Adobe Photoshop and Nik Silver Efex. Having Nik Silver Efex isn’t necessary as the bulk of our work revolves around Photoshop, but I cover it here because I consider it to be the best tool for creating black and white images.

In the tutorial we’ll be talking about what to emphasize in your image and how to emphasize it along with swapping out skies and working very selectively with curves and channels based selections.

The tools we’ll be using in this tutorial are available in Nik Silver Efex 2 and across all versions of Photoshop CS.

Thanks for watching and don’t forget to subscribe to my YouTube channel for more updates!

The post Fine Art Architecture Processing in Photoshop appeared first on Vibrant Shot Photography.

Shallow Depth of Field in Studio Portraits

$
0
0

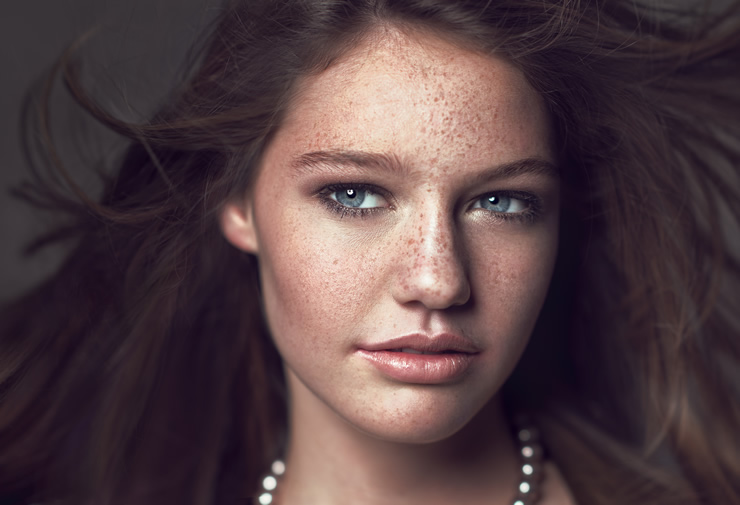
Woman with freckles in the studio

Who doesn’t love a portrait with a nice, creamy shallow depth of field? It’s certainly a look that I love and use often. While its application is fairly straightforward outdoors under natural light, in the studio things become a bit more tricky. Typically when shooting in the studio with strobes, we’ll close down our f-stop to around f/11 to cancel out the ambient light and bring our shutter speed in line with the sync speed of our flashes (usually between 1/160th and 1/250th). With a wide open aperture like f/1.4, things are a little bit different so we have to apply some tricks to get around sync speed limitations. If you use continuous lights like a Spiderlite or Kinoflos then problem solved. Kinos give a particularly nice look and since they are relatively low power when compared to strobes, you’ll want to open up your f-stop as much as possible anyway. Of course being continuous, there are no sync speed issues. For the remainder of the post we’ll assume your using strobe lights, as many of us do. Here are some tips to use when shooting wide open in the studio:

  1. Cut out the noise – Dim your ambient lights nice and low. You’ll want to minimize the amount of ambient light as even a faint amount of light becomes noticeable at f/1.4 and could lead to mismatched light temperatures when combined with your daylight balanced strobes.
  2. Find auto focus assist – If you have a strobe with a modelling light, use it to gently light your subject so that your auto focus still works. This is obviously critical since the DOF at f/1.4 is tiny and you’ll want to be tack sharp where it counts. Another trick is to have an assistant hold a flashlight and shine it in the subjects eyes and turn it off before you fire the shutter. This has the added advantage of shrinking the pupil and making the eyes look better.
  3. Get low – Get your strobe as low in power as possible. If you’re using a 1200ws strobe head, this is going to be next to impossible so use a flash head that has a low output. Off camera speed lights work great as you can set them all the way down to 1/128th power and create a very faint pop of light. You can also run them in high speed sync, thus eliminating sync speed issues altogether. In this case you can just enable TTL mode, set your aperture and the flash will make sure to light your subject correctly. Assuming you want to stick to studio strobes to make use of your diffusers, there’s a bit more that we can do. On portable power packs like the Elinchrom Ranger Quadra that I use, you can plug the strobe head into B-Port which outputs 33% of the packs power. Bringing the strobe to a minimum on this port gives me a low enough power to shoot at a wide open aperture like f/1.4 or f/2. Additionally you can stack layers of diffusion on top of your strobe to reduce its output further. A folded white bed sheet works well, or if you’re using a softbox you can place a reflector pan (like in a beauty dish) inside it which will also lower its output.
  4. Go Big and Move Out – If you can’t power your strobe down anymore you can always move the strobe farther away from your subject and harness the inverse square law. When you do this you’ll have to increase the size of your light source to maintain the same light softness so you’ll need a larger diffuser on hand.
  5. Add a Filter – If you still can’t get your shutter speed in line with the sync speed of your strobes after trying the above tricks, the final option is to use a neutral density (ND) filter. A three stop ND filter will more than suffice and generally produces minimal to no color casting. If you don’t have an ND filter, you can also use a polarizing filter which provides two stops of light reduction. I’ve used both on occasion and both work equally well.
  6. Consider your Subject – In order for the shallow depth of field to look pronounced, you’ll have to create depth along the focal plane. Usually this happens naturally outdoors by having an interesting backdrop or one that produces a nice bokeh. In the studio we’re typically working with a seamless or muslin background which result in a uniform background at wide open apertures. Instead, you can maximize the shallow DOF effect by positioning your subject at an angle so that a shoulder is closer to the camera than the other, you can also use a hairstyle that has a lot of front to back depth, or shoot from a higher angle downward on your subject so that the focus melts away as you approach the bottom of the frame.

Once you’ve nailed down a proper exposure and effective composition using the above tricks, the rest boils down to the same skills and techniques used in standard studio apertures.

The post Shallow Depth of Field in Studio Portraits appeared first on Vibrant Shot Photography.

Using Adobe Camera Raw as a Filter in Photoshop CC

$
0
0

In this quick video tutorial we’ll take a close look at the new Camera Raw filter that has been added to Adobe Photoshop Creative Cloud edition and how it can be used in combination with smart objects and smart filters.

Unfortunately it doesn’t appear as though this feature will be making its way into a Photoshop CS6 update so if you want it, you’ll have to sign up for Adobe Creative Cloud and download Photoshop CC which is a separate install from CS6.

Thanks for watching and don’t forget to subscribe to my YouTube channel for more updates!

The post Using Adobe Camera Raw as a Filter in Photoshop CC appeared first on Vibrant Shot Photography.

Don’t Leave Photoshop as an Afterthought

$
0
0

As you develop your photography and post processing skills one of the most important things to do is to pre-visualize your final image and think about what can be done with post processing, long before you press the shutter. Having a plan for your images is crucial as your early actions will largely dictate the options you have once you get to the post processing stage. While this sounds easy in principle, in practice it’s a bit tricky. Not only does it require that you have a good knowledge of what is possible in post processing and what you need to make it happen, but you also have to take post processing from a “experiment and see” sort of mindset and go in with a concrete plan. What I usually try to do to in order to narrow my range of options \is to think about what tools are available to make my image more interesting or look different than other images I’ve seen of the same or similar subject. My options usually break down as follows:

Long exposure?

Do I want to shoot a long exposure here? Do I have water or a sky that will look great? If the sky is clear but I have water, should I still shoot long exposure and blend in a different sky later? If I’m going to blend a sky, do I have it already or will I have to shoot one?

Do I have moving trees, weeds, boats, etc? If so, should I take a normal shutter speed exposure so I can blend them out and freeze them later? Does the subject justify the time involved in doing so?

Multiple exposures?

Are there lots of people that I will want to blend out later? How many shots will I need to get rid of them all? Is the subject worth the time involved? Is there a stationary object blocking my view? Can I get rid of it by taking shots from an alternate POV and then using them to mask it out (there will be a future video tutorial on this)?

Is there a depth of field issue? Should I shoot multiple exposures at different focus points to blend later?

Is the dynamic range too wide for a single exposure? How will I blend them, HDR, luminance masks, painted masks? Will I be going for a more natural or surreal feeling? Should my composition match that feeling?

Do we have any contrast issues due to our light source(s) (e.g. shooting into a sunset)? Do we need to block off part of the frame to retain contrast and then blend the light source(s) in separately?

Do I want to take pieces of the scene from slightly different times of day? Perhaps I can shoot the sky right after sunset but shoot the subject a little later into blue hour when the lights have come on.

Are there other elements that we can blend in to make the scene more interesting? Perhaps a lone person walking or some birds will help bring the photo to life? It’s often easiest to shoot these while on site so that light quality and location match the rest of the image.

Panoramas?

Can I fit everything I want to into the frame with the lens that I have? Am I worried about wide angle distortion? Is the main subject near or far away (will I be able to stitch it easily)? Do I need this in a higher resolution than one frame is capable of? Do I simply want a different look than a wide angle lens is capable of producing?

Getting started

Now that we have a ton of options at our disposal, we have to do is eliminate options. If for example we don’t have a tripod, that pretty much eliminates long exposures and makes all other options much more difficult. Do we have time to get creative with this shot or do we just want to capture something? How interesting is the subject really? Do we foresee a killer shot or just something that’s OK? If you have a tripod then most of these don’t take too long to do in post but if you don’t then blending out fifty people with multiple handheld exposures is going to be nothing short of a nightmare. Once your circumstances narrow your range of options all that’s left is to take the necessary images. When in doubt always overshoot and as you refine your process, the number of excessive or redundant images will steadily drop.

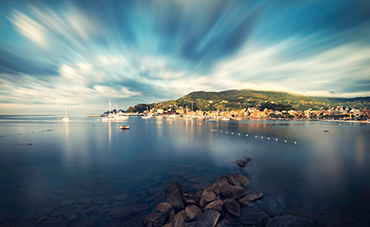
This image serves as a good example of shooting for post processing. Here I took three vertical long exposure panoramas and for each vertical slice I shot a -1 ev standard exposure image to bring more saturation into the horizon and to freeze the motion of the boats on the water and finally a +1 ev standard exposure to bring out shadow detail. Lastly, there was a pier with some tanning beds on the right of the frame which I suspected won’t look good in the end so I shot some more long exposure water and coastline at the same location that I could flip and use to cover the entire pier.

Remember that you can do a lot in Photoshop but you can’t create pixels out of nothing. Pre-visualizing your final image and studying the scene can save you hours in post processing and create an image that might otherwise not have been possible.

The post Don’t Leave Photoshop as an Afterthought appeared first on Vibrant Shot Photography.

Natural Outdoor Portrait Retouching Tutorial

$
0
0

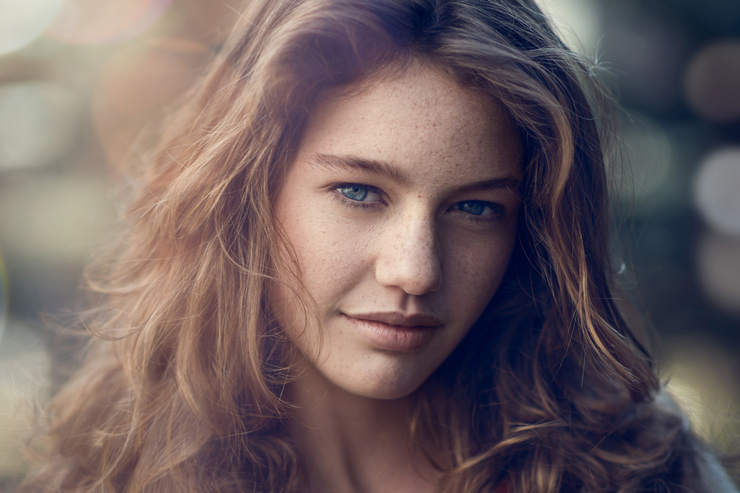
This video is the first in a two part tutorial on retouching outdoor portraits and retaining a natural look using Adobe Photoshop. In this first part we will focus on fixing hair and making the skin look great using frequency separation and dodging and burning. Part 2 will look at sharpening, toning, refining details like the eyes and hair as well as adding some styling elements like bokeh and lens flare. The final result is shown above.

The tutorial is beginner to intermediate in nature and I try to cover every technique in a step-by-step manner. Just about all the tools we’ll be using in this tutorial are available in Photoshop CS3 and onward. We won’t be using any plug-ins.

Since we’ll be spending a good amount of time on dodging and burning and frequency separation, you may want to first review our detailed tutorials on those two subjects. This video will serve as a real world example of those two techniques for an actual portrait retouch.

Stay tuned for part two which will be released July 16th.
Thanks for watching and don’t forget to subscribe to my YouTube channel for more updates!

The post Natural Outdoor Portrait Retouching Tutorial appeared first on Vibrant Shot Photography.

Viewing all 44 articles
Browse latest View live