Quantcast
Channel: Vibrant Shot Photography
Viewing all 44 articles
Browse latest View live

How to Easily Correct Colors and Match Tones in Photoshop

$
0
0

In this tutorial I’ll show you a unique approach to correcting mismatched colors quickly and intuitively. Unlike some of the other tools available to you such as curves, selective color or hue/saturation, this approach requires very little guesswork and is largely automated thanks to the corresponding action provided here. Big thanks to my buddy Brock McFadzean for helping me refine the action process. He’s a great photographer and a master at Photoshop actions so check out his work here.

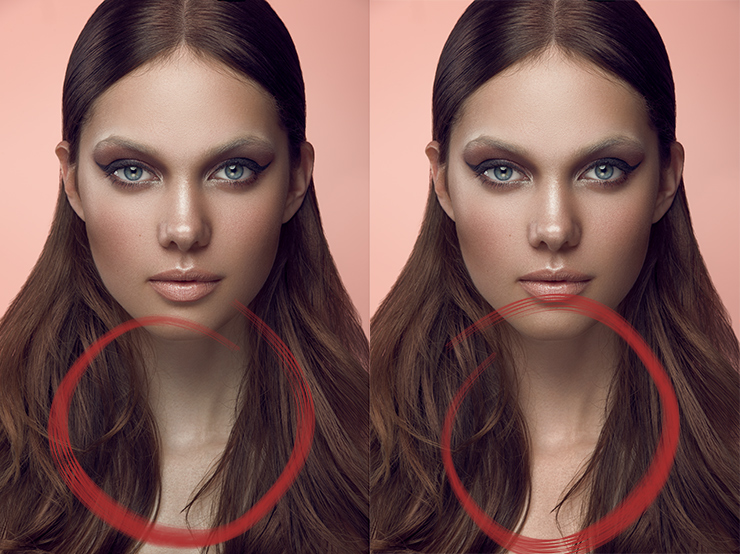
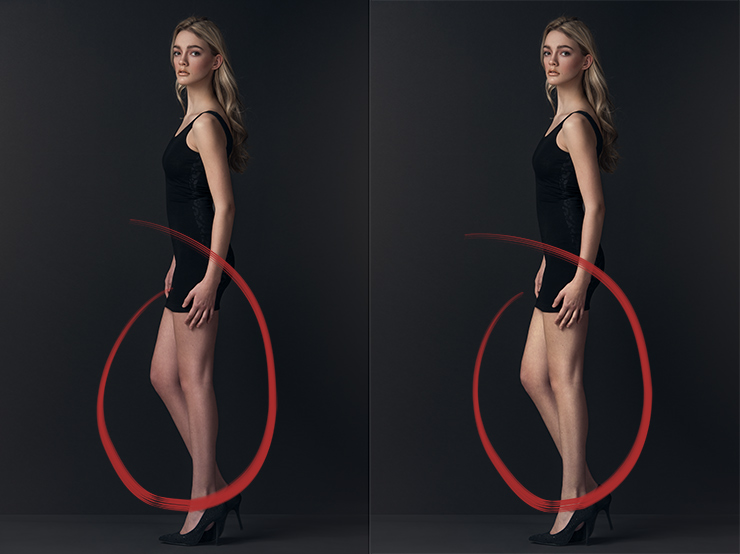
I call the technique the Subtracted Average Color Adjustment (SACA) – for lack of a better name – as this is exactly what it does. It takes two averaged colors, computes the difference between them and applies that difference to a destination area via the appropriate blend mode. It works best for fixing issues such as those presented in two sample images below whereby parts of the body do not match the face or other areas. Note that this technique does tend to work best if the mismatched area is darker than the source which happily is the case in the majority of situations. In the rare case that it is lighter, you can either darken affected area first with a curve – save the mask used for the darkening so you can re-use it later – and then run the action, or run the action in the standard manner and use the darkening curve provided to bring the luminosity down. The former approach will provide you with a better result than the latter.

Before and after

The above is a common situation that you’ll run into whenever shooting in the studio with a small light modifier like a reflector pan or beauty dish, whereby the neck and chest area don’t match the tones in the face.

Before and after

In the above we run into a similar situation where the lower half of the body has a different brightness and hue than the upper body.

The action and technique will work in Photoshop CS5 and beyond and we’ll use it do tackle both of the above problems in this video.

Thanks for watching and don’t forget to subscribe to my YouTube channel for more updates!

The post How to Easily Correct Colors and Match Tones in Photoshop appeared first on Vibrant Shot Photography.
How to Quickly Even Out Rough Skin Texture and Pores

$
0
0

In this tutorial I’ll show you a quick and unique approach to fixing rough skin texture and pores while retaining the desirable skin texture that keeps the image looking natural and professional. There are a few steps involved in this process so I’ve created an action for you that keeps things simple and intuitive. The action can be downloaded here.

We’ll be taking a fairly unique approach in this technique by using sharpening as opposed to blurring to reduce the offending texture. This requires the appropriate selection of values in the Unsharp Mask tool in order to achieve a good result. In the video I’ll show you what those settings should be and demonstrate the technique both with and without the action.

With the action, all you need to do is select the right Unsharp Mask settings and then brush in the area of the offending texture so most applications take less than a minute. Since Unsharp Mask is available in Photoshop CS3 and perhaps even older, you should have no problem running the action with your version of Photoshop.

Thanks for watching and don’t forget to subscribe to my YouTube channel for more updates!

The post How to Quickly Even Out Rough Skin Texture and Pores appeared first on Vibrant Shot Photography.

Color Grading and Correction with Capture One Pro

$
0
0

In this tutorial I’ll be taking you through the ins-and outs of color grading and color correction using Phase One’s Capture One Pro software.

We’ll be looking at how to neutralize color casts, achieve beautiful skin tones, changing colors, as well as applying cinematic grading to your portrait or fashion images. For this tutorial you’ll need to have version 8 of the Capture One software as we’ll be using local adjustment tools for certain techniques while others can be done with older versions. If you’re just getting started with Capture One, be sure to visit my getting started tutorials here.

If you’re interested in purchasing Capture One Pro, be sure to use the discount code AMBMICHAEL for 10% at the Phase One store.

Thanks for watching and don’t forget to subscribe to my YouTube channel for more updates!

The post Color Grading and Correction with Capture One Pro appeared first on Vibrant Shot Photography.
Dodging and Burning with Capture One Pro 20

$
0
0

In the below tutorial, I take you through the details of how we can translate the Dodge and Burn technique that we know well in Photoshop, into one that can be applied at the raw level in Capture One Pro. While capabilities for Dodging and Burning have existed in Capture One since version 11, the process that was once a bit cumbersome and limited is now refined and intuitive with the release of Capture One 20.

The video will show you how to create your layer stack, helper layer and brush settings as well as the mechanics of performing the dodging and burning itself.

The Layer Stack

For our layer stack we will need to create between 3 and 7 layers. A corrective dodge, a correct burn and a helper layer are our minimum setup. For a more full featured stack, we will also include a pair of strong corrective dodge and burn layers and a pair of contouring dodge and burn layers. The usage of these layers is outlined in the video but I’m providing a summary of the settings for each one here as a reference.

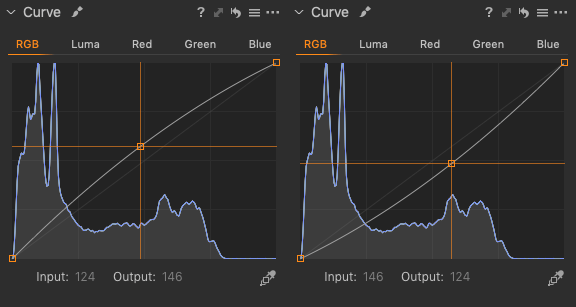
For the corrective dodge and burn pair. Add a new layer named corrective dodge and proceed to the curves adjustment as shown here. On the RGB curve, you’ll set your Input value to 124 and your Output value to 146. Much like its dodging counterpart, we’ll create a corrective burn layer and make an opposing curves adjustment within the RGB curve by setting Input to 146 and Output to 124.

Curve settings for dodge and burn layers in Capture One

Curve settings for dodge and burn layers in Capture One

The strong layers are meant to be a more powerful version of the above pair to be used for aggressive changes to details like eyes or lips and are created as follows. For these we will make adjustments to both the RGB curve and the Luma curve to make the effect far more pronounced. For the corrective dodge (strong) layer, In the RGB curve, the Input and Output values should be set to 137 and 153 respectively, while the Luma curve Input and Output values are set to 141 and 174. For our strong burn layer, we’ll make dramatic adjustments in the other direction. For the RGB curve, Input is set to 137 and output to 121 and in the Luma curve, set Input to 142 and Output to 110. You will notice a much more rapid buildup when painting on these layers so ensure that you build up your brush strokes gradually to avoid excessive retouching.

Luma and RGB curve settings for the strong dodge and burn layers

Luma and RGB curve settings for the strong dodge and burn layers

The dodge and burn contouring layers will be used to add depth and dimension to the image and are set up in the same manner as the corrective dodge and burn layers we’ve shown above. The only slight difference we will make is to set the opacity of these layers to 50% as opposed to 100% that we used prior. This will give us more latitude to adjust the intensity of the contouring up and down as needed at the end.

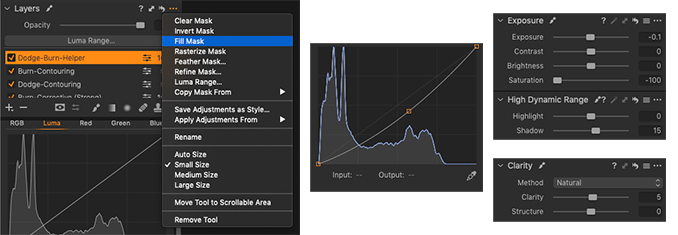
The final layer we need is our helper layer which will aid us in better visualizing the luminosity inconsistencies within the skin so we must both remove the color and darken our image. This is achieved via the adjustments shown below. To get started, create the new helper layer and fill the mask as shown below. Unlike the above layers, the mask must be filled in order for us to see our changes. Begin by setting Saturation to -100, Exposure to -0.1, and the RGB curve Input and Output to 146 and 115 respectively. As a final refinement, in the High Dynamic Range section, increase the Shadow value to 15 and the Clarity value to 5.

Helper layer creation and settings

Helper layer creation and settings

As you can see, creating these layers each time is rather time consuming and prone to error. If you find it it cumbersome to create the various layers needed, you may be interested in checking out my Dodge and Burn Layer Stack Helper Script to automate this process and make it quick and painless.

Since the recording of the above video, Capture One 20 (13.1) has been released which brought with it the enhancements to the brush tool and healing brush. These changes can be found in the quick video below.

Thanks for watching and don’t forget to subscribe to my YouTube channel for more updates!

The post Dodging and Burning with Capture One Pro 20 appeared first on Vibrant Shot Photography.

Viewing all 44 articles
Browse latest View live